
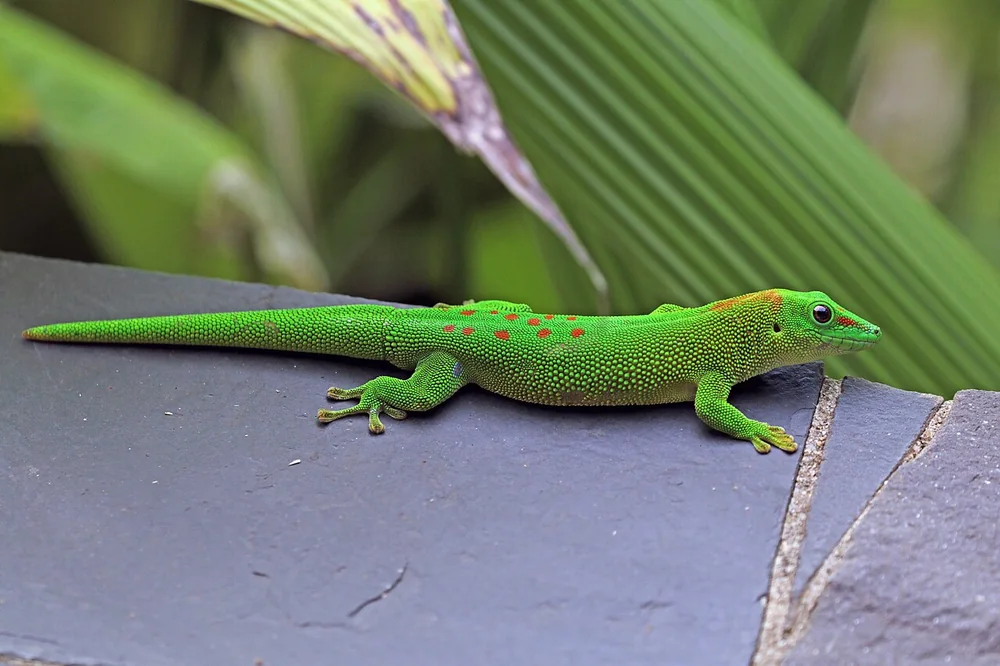
Giant Madagascar day gecko
Phelsuma grandis
Photo: Madagascar giant day gecko (Phelsuma grandis) Nosy Komba · Charles J. Sharp · CC BY-SA 4.0 · Changes and credits
These guides provide general husbandry information and do not replace veterinary assessment. If your animal shows symptoms or its condition worsens, contact a veterinarian experienced with exotic animals.
- Warm zone
- 29–32 °C · basking perch
- Cool zone
- 25–28 °C · cool area
These notices cover the cited provisions, not every possible national or local rule. Check additional requirements with the competent authority.
Description
Phelsuma grandis is a large day gecko from northern Madagascar. Its bright green body bears individually variable red markings on the head and back. It inhabits trunks, vegetation and human-modified habitats; adhesive toes let it run across smooth surfaces while searching for insects, nectar and fruit.
Behaviour
Fast-moving with delicate skin: observation and voluntary interaction are preferable to restraint.
Housing together
House individually so each animal has unrestricted access to shelter, food and the thermal gradient. Breeding introductions require supervision and a separate enclosure prepared in advance.
Enclosure and climate
Connect branches, cork and foliage from top to bottom, including off-ground shelters. Secure the basking perch and retain access to a cooler lower area.
Secure a probe to the perch under the heater; also monitor air at different heights. Night 23–25 °C.
Making height usable
Secure horizontal, sloping and vertical branches to the structure, using diameters that offer grip and supports suitable for adult weight. Connect them from the exposed lighting branch to the cool area, distributing supports across levels. Place hide entrances beside branches; add foliage along routes without blocking dishes, doors or vents.
Testing and access
Connect specified heat sources to compatible thermostats and guard against contact. Secure probes according to device instructions; measure air at resting sites and heated surfaces separately with independent instruments. In housing with water, also check water temperature and quality: one zone’s thermostat does not control the others.
With the complete enclosure running, record day and night readings and compare them with the sheet. Test doors, cable openings and cleaning access, keeping vents clear. Change one variable at a time and recheck after each adjustment.
Lighting and UVB
Zone 3: open or partial sun exposure; ecological UVI band 1–2.6.
At the exposed position aim for approximately UVI 3–4, measured at the back or head. The animal must choose its exposure and reach UVI 0 retreats. This local target differs from the Ferguson ecological band and should not be maintained everywhere throughout the day.
UVB is essential in indoor housing. Outdoors, direct sunlight can provide it if shade is always accessible. Select the lamp to achieve the appropriate UVI at the positions the animal uses.
UVA is recommended as part of daytime lighting, including when UVB has not been shown to be indispensable. Check the UVB source’s spectrum, as it may already emit UVA: a second lamp is not automatically necessary.
Linear UVB tube with reflector. Indicative UVB percentage stated on the lamp: 5–7%; final selection depends on UVI achieved at the actual distance.
For maintenance, a cycle of approximately 12 hours of light and 12 hours of darkness can serve as an initial reference. Use a timer to switch lights off at night, and keep retreats available so the animal can withdraw from light during the day. Adapt day length to species and origin, following the specific guidance for seasonal care and breeding.
Light in the animal’s daily life
Place a bright bamboo basking site beside screened branches. Measure at back height at the highest climbing position, including glass and mesh.
An example layout in the enclosure
To make the layout concrete, take housing measuring 61 × 61 × 122 cm, using the first dimensional configuration in the sheet. This is a mounting example: retain the conditions and any alternatives attached to the stated minimum.
In a wooden enclosure with internal lighting, imagine the tube 117 cm above the floor and the back or head at 77 cm. The geometric distance is therefore 40 cm. The branch or platform lies below animal height, according to body size. Place lighting over one side, with a route to fully screened retreats.
In a glass enclosure with a mesh roof, retain the same animal height and imagine the tube 5 cm above the mesh: distance becomes 50 cm. Mesh attenuates UV variably; ordinary glass roofs block UVB. Increasing the percentage alone is insufficient: measure beneath the mesh and adjust height, output or layout as needed.
These distances describe the example, not a safe clearance for every lamp. Select the source and adjust mounting until approximately UVI 3–4 is measured at animal height in the exposed position. Also respect the minimum clearance specified for the model used. Recheck with furnishings, guards and mesh installed, including the highest reachable points and animal growth.
Choosing and checking lighting
First define the patch that should illuminate the whole body and the route to a screened retreat. For a broad patch, select a linear tube with reflector; consider a compact only if its useful patch covers the body and leaves an accessible gradient. Check model, output, reflector and mounting distance, then compare measured UVI with the species target. Label UVB percentage alone cannot determine distance and intensity.
The decisive check uses a UVI meter facing the source at animal height. Check the centre and edges of the exposed patch, the highest supports and retreats, which must allow withdrawal from UV. Repeat after moving equipment, changing lamps and plant growth. Without a meter, use the manufacturer’s instructions and measurements for the exact configuration, including safety clearances.
When UVB or UVA are absent
If the UVB source fails, restore the installation and recheck the exposed area. Oral D3 may be considered as temporary support but is not a complete or universally safe replacement. Consider calcium, D3, diet and animal condition together: avoid improvised extra doses.
UVA contributes to environmental perception and behaviour and cannot be replaced by vitamins or calcium. A reptile UVB source normally also emits UVA: check its declared spectrum. If the existing lighting lacks it, complete the installation with a suitable source; an ordinary white LED does not guarantee UVA and a UVA-only lamp does not provide UVB.
Humidity and ventilation
Place the hygrometer at resting positions and compare readings across areas before and after adding water and during drying. Record where and when each check was taken. If humidity stays outside species targets, first check for blocked vents and wet bedding; adjust water input or ventilation and recheck rather than wetting the whole enclosure to correct one spot.
Feeding
Phelsuma grandis: alternate insects and a complete diet suitable for day geckos. Sugary nectar and fruit alone do not replace protein and supplementation; young animals need much smaller prey than adults.
Recommended foods
The tiers describe dietary use: rotate foods within each tier rather than treating them as an absolute nutritional score.
| Food | Dietary role | Benefits and limits | Preparation |
|---|---|---|---|
| Crickets and locusts | Main choices | Supply protein and encourage hunting; calcium is low relative to phosphorus, so preparation and supplementation are needed. | Use captive-bred insects and gut-load them as described below. Select suitably sized feeders, place the meal’s batch in a clean container and apply a thin calcium coating immediately before offering them. |
| Complete fruit-eating gecko diet (CGD) | Main choices | A formulation labelled complete provides protein, calcium and vitamins in defined proportions; fruit purée and supplementary nectar are not equivalents. | Measure powder and water separately in the package ratio, then mix to the specified consistency. Place a portion in a clean, reachable cup. Record preparation time and discard leftovers within the stated time, sooner if appearance or smell changes. |
| Ripe fruit | Occasional | Rich in water and sugar and not a complete food; offer a small taste replacing part of the meal. | Wash and remove stones and large seeds; no syrup-preserved fruit, honey or added sugar. |
| Wild insects, fireflies and contaminated prey | Avoid / not a staple | May carry pesticides, parasites or toxins; a healthy appearance does not establish safety. | Use traceable feeder cultures; do not collect insects beside roads or treated gardens. |
Comparable nutritional values
Protein, fat, calcium and phosphorus are percentages of dry matter, excluding water; dry matter itself is a percentage of fresh weight. These are reference analytical values compiled in a clinical table, not guaranteed contents of your batch or a universal ranking. Age, rearing, feeding and supplementation change composition. Do not compare them directly with fresh-food percentages or already diluted prepared diets. Comparable numbers are not provided for other foods.
| Insect | Dry matter | Crude protein | Crude fat | Calcium / phosphorus | Ca:P |
|---|---|---|---|---|---|
| Adult house cricketAcheta domestica | 32% of fresh weight | 62.6% DM | 20.4% DM | 0.3 / 1% DM | 0.3:1 |
| Migratory locustLocusta migratoria | 31% of fresh weight | 67.5% DM | 14% DM | 0.1 / 0.7% DM | 0.14:1 |
DM = dry matter. Ca:P describes calcium relative to phosphorus before supplementation: a protein-rich feeder may still be calcium-poor. Offered portions remain those for this species and life stage.
Meals by age and size
| Stage and size | Frequency | Amount per meal |
|---|---|---|
| From hatching to about 6 months, while growth is rapid | Small insects daily; small amounts of prepared diet every other day | Initial trial portion: 3–5 small insects, one at a time. Count those eaten in about 5 minutes; stop when interest wanes rather than continually refilling. Adjust the count to actual prey size and growth. Use a thin layer of prepared diet and check lick marks. |
| Over about 6 months, with slowing growth; adults | Insects 2–3 times weekly; complete prepared diet once weekly | Initial trial portion: 3–5 small insects, one at a time. Count those eaten in about 5 minutes; stop when interest wanes rather than continually refilling. Adjust the count to actual prey size and growth. Prepared diet replaces part of the weekly ration. |
Adjusting portions
To assess the portion, compare the amount and type of food eaten with growth and body condition. Weekly weighing of juveniles and monthly weighing of adults helps follow the trend. Adjust the ration gradually when growth or reserves require it; reduce it if body condition indicates excess weight or leftovers remain. Investigate unexpected weight loss or abnormal swelling rather than addressing it only with more or less food.
Preparing and offering meals
Prepare insects during the 24–48 hours before feeding: keep them in their culture container with a complete feeder diet and safe hydration. Check access to food and water and remove spoiled leftovers. Then select feeders of the specified size and prepare only the batch to be offered. This step, called gut-loading, improves prey quality; bran or potato alone do not correct deficiencies.
At feeding time the prey should be easy to swallow. As an initial guide, choose insects no wider than the space between the eyes, then adapt size to the mouth and the animal’s response. Offering them individually or in an escape-resistant dish lets you see actual intake and remove leftovers.
Trial amounts are a starting point for a healthy, active animal at correct temperatures: record intake and weight trend, then adjust the ration. Do not feed again merely because it continues striking at prey.
Calcium and vitamins
Immediately before feeding, lightly coat low-calcium insects with phosphorus-free calcium: they should remain visible, without clumps. Common insects often have an unfavourable calcium:phosphorus balance; rotating them alone does not correct it.
Supplement insects; do not further dust a diet labelled complete. Record all products to avoid duplicating D3 and vitamin A.
Choose one supplementation programme: plain calcium for ordinary meals and a species-appropriate multivitamin at its labelled feeding intervals. Record the product and its existing D3 and vitamin A; do not add a second dose to meals using a combined product. With measured UVB, agree the oral D3 provision; product concentrations are not interchangeable.
Daily care
First days
Before arrival, run the complete enclosure and check temperature, light and humidity at usable positions. Prepare water, retreats and first food. On arrival, follow a quiet routine for feeding, water changes and cleaning; record food offered, leftovers and weight. Delay unnecessary contact until the animal feeds regularly and moves confidently. Weakness or weight loss warrants veterinary assessment.
Cleaning
Each day check water and collect waste, including beneath retreats, with dedicated tools. Clean dishes and replace their water; for pools follow the species’ water-change plan. Wash your hands afterwards. Keep animals and equipment away from kitchens and food areas, use tools dedicated to each enclosure and wash your hands with soap and running water after handling animals, food, tank water or furnishings. Quarantine new arrivals separately and agree the duration and checks with a veterinarian before introducing them to established animals.
Handling
For transfers, prepare a container and allow entry. Grasping the body or tail can damage the skin; remaining still does not indicate enjoyment of contact.
Checks
Monitor appetite, weight and movement. Weight loss and weakness are not a normal settling stage.
Labored breathing, wounds, burns or marked stool changes need veterinary assessment; this sheet cannot establish a diagnosis.
Do not tear retained skin or indiscriminately raise temperature or humidity: verify measurements before adjusting the setup.
Breeding
Sex, maturity and readiness
Distinguish sexes using femoral pores and tail base without grasping delicate skin. Use fully developed females with an adequate mineral supply: visible calcium sacs alone do not prove readiness.
Start a record for each breeding animal with identity, origin, documented age and previous weights. Compare the weight trend with growth and body condition; delay introductions for animals still growing rapidly, losing weight or recently acquired. Use stated ages as guidance alongside these checks. If sex cannot be identified reliably, obtain assessment by qualified personnel before pairing.
Preparation and seasonal cycle
Prepare a pair in an enclosure rich in visual barriers and observe head movements and male approach. Separate if pursuit prevents feeding or basking. A mild seasonal pause allows recovery between clutch series.
Before encounters, prepare and test offspring enclosures and have first foods available. Check records for regular adult feeding and good body condition, then verify access from exposed areas to retreats. If the species protocol includes seasonal changes, adjust settings gradually and record the response. Record night-time air, surface and egg temperatures separately, noting where each is measured. Keep water available throughout preparation.
Courtship and mating
Introduce only identified, compatible adults, with another enclosure ready. Observe from a distance and end the encounter if you observe persistent pursuit, injuries or an animal unable to move away from its partner; do not forcibly separate animals during copulation. Record the date, both identities and what you actually saw: courtship, contact or mating alone does not prove fertilisation.
Before laying and the nest
Offer bamboo cavities and protected sites among leaves. Eggs are generally laid in pairs; collect loose eggs without separating joined shells. Do not assume the chosen site should match the adult basking temperature.
Maintain a suitable laying site even without a male: females can produce unfertilised eggs. Persistent straining without laying, weakness or tissue protruding from the vent require prompt veterinary assessment. Do not wait for a predicted laying date if these signs appear. Do not squeeze the abdomen, pull eggs or give drugs to induce laying without veterinary direction.
Egg incubation
Stabilise eggs in a small dry support above moist substrate without contact with free water; alternatively guard a suitable enclosure site. The temperature-duration combination is not sufficiently documented here to assign one value to every clutch.
Test the system before laying with an independent probe at egg height. Use clean, labelled containers, closed but allowing air exchange, with room for eggs and hatchlings. Keep eggs in their original orientation and do not detach eggs glued to their support. The substrate should retain moisture without free water on the shell; check condensation and water loss, adding water at the edge of the substrate rather than onto eggs. Record temperature and events daily without needless opening. The stated times are approximate: do not increase heat to meet a date.
First meals and juvenile care
Remove hatchlings from adults and use escape-proof enclosures with small branches and accessible droplets. Start supplemented fruit flies and pinhead crickets, alongside a little complete day-gecko food. Check daily that no youngster monopolises food.
During the first weeks, monitor each youngster: a feeding group does not guarantee that every individual eats. Record intake, droppings and weight at regular intervals to follow growth and adapt housing and food size. Provide separate accommodation if competition prevents an individual from feeding or size differences become marked. Document repeated independent meals before transfer to another keeper.
Female recovery
After reproduction provide water and the usual balanced diet, initially in manageable portions; monitor weight, activity and return of appetite. Keep supplements and lighting consistent with the feeding guide. Avoid further introductions until the previous condition has recovered; later clutches may occur without another mating. Persistent straining, weakness or protruding tissue require veterinary attention, without squeezing the abdomen.
Equipment and example diary
Place the nest where it can be checked without dismantling the enclosure. Label containers with female identity and laying date and prepare the specified medium; for attached eggs, instead provide guards in place without detaching them. If using an incubator, install a thermostat and independent probe and test it before laying. Run offspring enclosures too and prepare scales and first food, reserving capacity for later clutches.
A consistent diary using actual dates helps follow reproduction in Phelsuma grandis. Start with adult identity, weight and condition, then record observed encounters, laying or birth and development conditions. After emergence record the first meal actually accepted and each youngster’s growth while continuing to follow female recovery. Over time these records help identify your lineage’s pattern without turning approximate durations into deadlines.